YouTube Thumbnail Text Generator
Add bold, cinematic, neon, or MrBeast-style text to your thumbnail canvas instantly. No Photoshop, no account — just open and start creating.
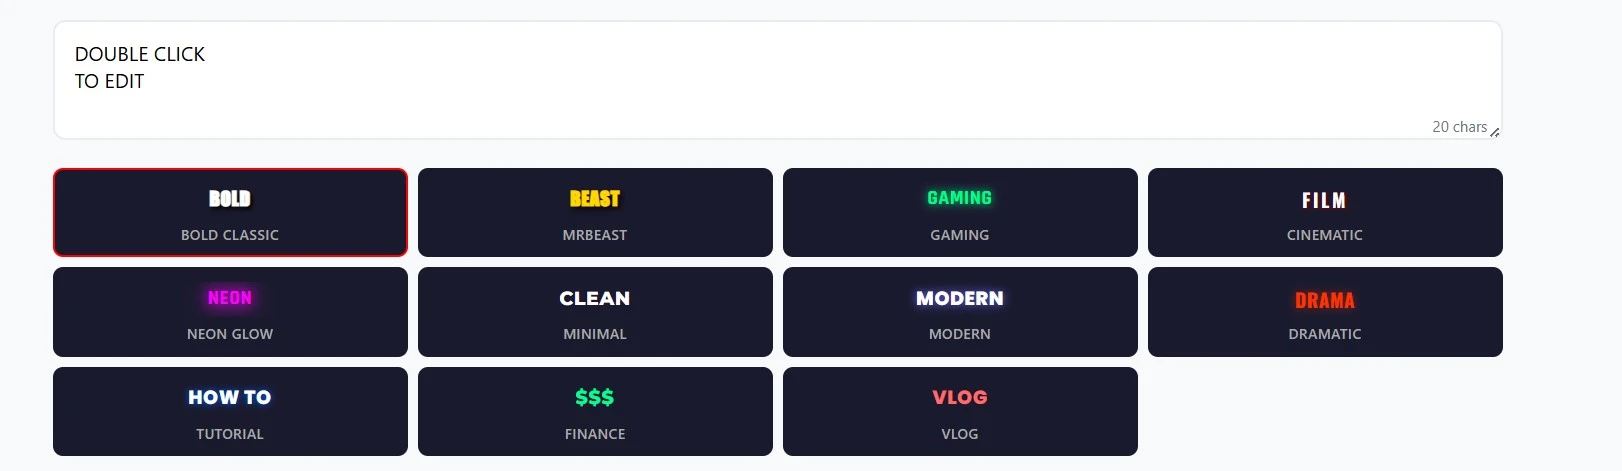
Hook Text Generator
Enter your video topic and choose a style. We'll generate real thumbnail text ideas you can click to use instantly.
I spent an hour on a thumbnail once. Perfect screenshot, great composition, dramatic lighting. Then I added text in my video editor, exported, uploaded, and checked on my phone. The text was unreadable. Too small, wrong font, no outline, got lost in the background. That’s when I built this YouTube Thumbnail Text Generator. Not because I wanted another browser tab open. Because I kept ruining good thumbnails with bad text.
Why Thumbnail Text Is Harder Than It Looks
You’d think adding words to an image is simple. Type, pick a font, done. But YouTube thumbnails live in a weird space. They have to work on a 27 inch monitor and a 5 inch phone screen at the same time.
I learned this the hard way. I made a tutorial video titled “Three Settings You Need to Change.” The thumbnail had the number 3 in huge letters on a dark background. Looked great on desktop. On mobile, the 3 sat right over a shadow and disappeared completely. Nobody clicked.
The real problems are contrast, size, and position. Thin fonts vanish when scaled down. Light text on a light background is invisible. Text placed near the bottom right gets covered by YouTube’s timestamp and video duration badge. Text near the edges gets cropped. And if your outline or shadow is too subtle, the whole thing blends into the image.
I’ve seen creators use white text with no outline on a cloudy sky. Unreadable. I’ve seen neon green on a bright game HUD. Also unreadable. Most people don’t realize that YouTube compresses thumbnails, which softens text edges. What looks crisp in Photoshop can turn into a fuzzy mess after upload.
What This Tool Actually Does
You drag an image in. The tool checks its dimensions. Then it resizes to exactly 1280x720 while keeping proportions. That usually means black bars unless you use the crop controls.
Most people want to fill the frame. So the resizer shows a crop box. You move it until the important parts are centered. Click apply. Download.
No manual math. No opening Photoshop just to change canvas size. It saves five to ten minutes per thumbnail.
Features People Actually Use
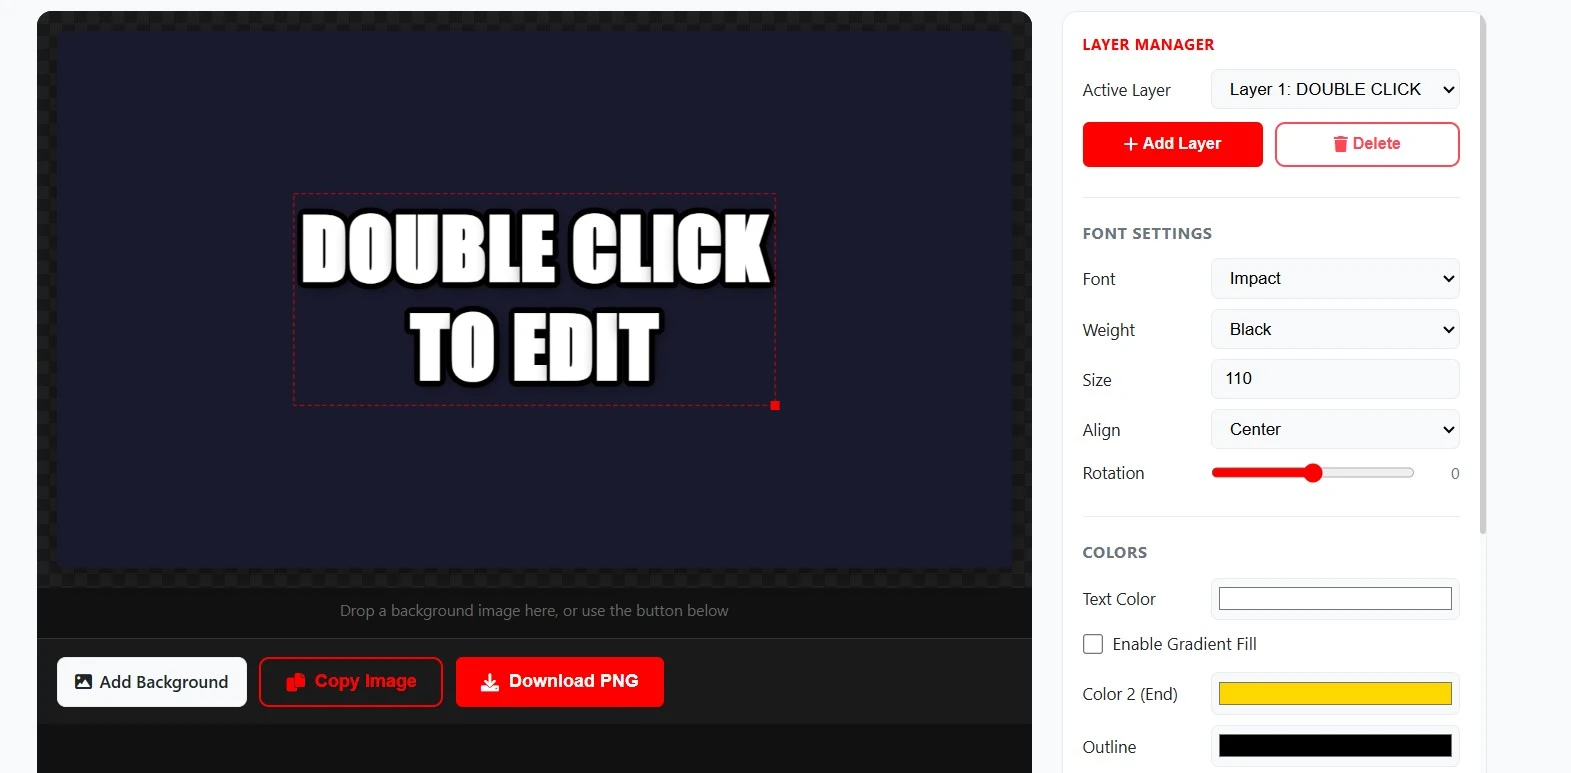
The drag and position control is the one I use the most. You just grab the text box and drop it where you want. The tool shows a safe zone marked with a subtle grid. Anything inside that zone won’t get cropped or covered by YouTube’s interface.
The outline slider saves my life constantly. Text needs an outline when the background is busy. I set outline thickness between 3 and 5 pixels. Black outline works with almost any text color. You can also choose any outline color.
Shadow is different from outline. Outline wraps around the letters. Shadow sits behind them at an angle. I use shadow when the background has a lot of contrast. It gives depth without making the text look like a sticker.
The color picker lets you choose any color, but I mostly use white or bright yellow text with a black outline. That combination works on almost any background. Dark text with a light outline works well on bright scenes.
Font selection is limited on purpose. No cursive. No thin weights. Just bold, blocky, highly readable fonts like Impact, Anton, Roboto Bold, and Bebas Neue. These fonts survive compression and stay readable on small screens.
The mobile preview toggle shows you exactly how your text will look on a phone. That’s where you notice that your 40 pixel font looks like 12 pixels. The tool recommends a minimum font size of 60 pixels at 1280x720 resolution. Anything smaller is risky.
The background contrast checker is subtle but helpful. It analyzes the area behind your text box and warns you if the text color is too similar to the background. I ignored it once on a dark forest screenshot with dark green text. Regretted it immediately.
Real Situations Where It Helps
List videos need numbers. Every time I make a top five or top ten video, I add large numbered badges over each screenshot. The text generator lets me add “1”, “2”, “3” in a bold font with a black outline so they pop.
Tutorial titles need short, punchy text. “How to” is too long for a thumbnail. I use “FIX THIS NOW” or “STOP DOING THIS” in all caps. The tool makes sure those words don’t get cropped.
React thumbnails need faces and text together. I add a word like “INSANE” or “NO WAY” near the face. The drag control lets me position it just above the shoulder so it doesn’t block the expression.
Before and after thumbnails need labels. I add “BEFORE” in gray and “AFTER” in bright yellow. The tool keeps them aligned and readable.
How it works
Everything runs in your browser. No images get uploaded to any server. You drag your thumbnail image, add text, and download the result. I don’t see your images or your text. No account needed. No email signup. Close the tab and everything is gone.
How to Use the YouTube Thumbnail Text Generator
Here’s the step by step process I follow for every video:
- Drag your thumbnail image into the tool. It can be a screenshot, a photo, or an existing thumbnail you want to update.
- Type your text into the input box. Keep it short. Three to five words maximum. Long sentences become unreadable on mobile.
- Use the drag handle to position the text box. Stay inside the safe zone. Avoid the bottom right corner where YouTube puts the timestamp.
- Pick a font from the list. Use bold, heavy fonts. Avoid thin or decorative fonts.
- Set font size. Start at 70 pixels. Go larger if you have less than five words. Go smaller only if you have a very simple background and high contrast.
- Choose text color. White or bright yellow work best. Dark colors only work on very light backgrounds.
- Add an outline. Set thickness to 3 or 4 pixels. Choose black for light text or white for dark text.
- Add a subtle shadow if your background has uneven contrast. Keep the shadow soft. Hard shadows look cheap.
- Toggle the mobile preview. If the text looks tiny or blurry, increase font size and outline thickness.
- Toggle the desktop preview to check positioning on a larger screen.
- Click download. The tool saves a new image with your text baked in. No layers, no fonts to embed. Just a flat, ready to upload PNG.
From drag to download, it usually takes less than two minutes.
Honest Limitations
This tool will not replace a graphic designer or Photoshop. You cannot do curved text, gradients, multiple text boxes, or layer effects. It adds one block of text to your thumbnail. That’s it.
Some fonts won’t render perfectly on every browser. Stick to the included fonts. They are tested and reliable.
The tool cannot fix a terrible original image. If your screenshot is dark, noisy, or blurry, text won’t save it. Fix the image first, then add text. If you need to prepare or scale your base image first, our YouTube Thumbnail Resizer can help. If you want to inspect successful layouts from other channels, you can run their links through the YouTube Thumbnail Downloader to save their covers.
Some images have important content at all four edges. No cropping algorithm can save that. You either lose something or keep black bars. The tool gives you options but can’t create new content.
What YouTube Actually Recommends
YouTube’s own guidelines on thumbnails don’t cover text specifically, but they emphasize clarity and mobile readability. You can check the official YouTube guidelines for details.
For general typography on screens, the W3C Web Accessibility guidelines explain contrast ratios. I use those principles for thumbnail text as well.
The Bottom Line
I built this YouTube Thumbnail Text Generator because I got tired of uploading thumbnails with unreadable text. It won’t write your video title for you. It won’t tell you what words to use. But it will make sure those words are visible, readable, and placed correctly. Try it on your next thumbnail. Check the mobile preview before you download. That one habit fixed more of my thumbnails than anything else.
Frequently Asked Questions
The canvas renders at 1280×720 pixels, which is YouTube's recommended thumbnail resolution. When you click Download, you get a full-resolution file at that exact size — no scaling or quality loss.
Yes. Click "Add Background" and select any image from your device. The tool will scale it to fill the 1280×720 canvas and apply a subtle dark overlay to keep your text readable. You can remove it any time with the Remove BG button.
Yes — when you check the Transparent option and download, the tool exports a PNG file with a transparent background. This is useful if you want to layer the text in another tool like Canva or GIMP on top of your photo.
The canvas always renders at 1280×720, but it's displayed smaller on screen to fit your monitor. The downloaded file is the full 1280×720 version, which is exactly what YouTube will receive. What you see on the canvas is an accurate scaled preview.
Completely free. No account, no email, no sign-up. Open the page and start using it immediately.